
How to Stop a Roof Leak in the Rain

When the rain starts pouring down, it’s a comforting sound for many of us. But for a few homeowners, rain can suddenly present a challenge in the form of a roof leak. Dealing with a leaking roof during a rainstorm can be difficult. In this article, we’re going to discuss the practical solutions to tackle roof leaks during rainfall. We’ll discover emergency fixes for a leaking roof and cope with some other common issue—water leaks around home windows. By the end of the article, you will know how to restore leaking windows and keep your home safe from water damage on rainy days.
How to Stop a Roof Leak in the Rain: Emergency Solutions
The first rule when dealing with a roof leak during rain is to act swiftly. The longer you wait, the more extensive the damage can become. Begin by moving any valuable items or furniture away from the leaking area to prevent further damage.
For a long-term solution, it is best to consult a roofing professional, but here are the quick fixes you can do during heavy rain:
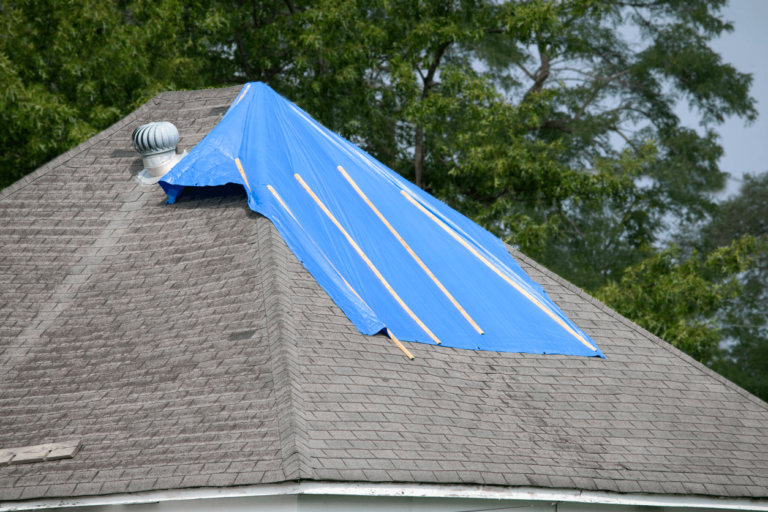
- Tarp Cover: Use a tarp or heavy-duty plastic sheeting to temporarily cover the affected area. Secure the tarp in place to keep rainwater out of your home.
- Bucket Placement: Place buckets or containers strategically to collect dripping water. This can help minimize water damage inside your home while you wait for professional assistance.
Use Sealant: If you can safely access the roof, apply roofing sealant or roofing cement to the source of the leak. This can provide a temporary barrier against water infiltration.
Roof Leaking Temporary Fix: Quick and Effective Methods
To address a roof leak effectively, you must locate the source of the leak. Sometimes, water can travel along roof rafters or beams before dripping into your living space, making it seem like the leak is coming from a different location. Use a flashlight to inspect your attic or crawl space for signs of water infiltration.
Once the source of the leak has been identified, here’s an easy method you can apply a temporary patch to stop or reduce the flow of water.
- Clean the Area: Remove any debris, dirt, or loose roofing materials from the leak site.
- Apply Roofing Cement: Use roofing cement or a roofing patch kit to cover the area. Make sure to extend the patch beyond the leak to ensure a proper seal.
Press Down: Press down firmly on the patch to ensure it adheres well to the surface.
Water Leaks Around Windows: Identifying and Addressing the Issue
Water leaks around windows are a common issue that can occur during heavy rain. Understanding the potential causes can help you address the problem effectively. Common reasons for water leaks around windows include damaged caulking, which can deteriorate over time and allow water to seep through the gaps. Improper installation, such as poorly installed or improperly sealed windows, can also lead to leaks. Additionally, issues with the window frame, such as cracks or gaps, can permit water infiltration.
To address water leaks around windows, you’ll need to inspect them closely. Start by checking for visible gaps or cracks in the window frame and seals. Examine the condition of the window caulking or weatherstripping, looking for signs of wear, peeling, or separation. Don’t forget to inspect the exterior of the window for any visible damage or deterioration.
Repair Leaking Windows: Step-by-Step Guide
Once you’ve identified the issue, here’s the step-by-step guide to repairing leaking windows:
Gathering Materials
Before you begin, gather the following materials:
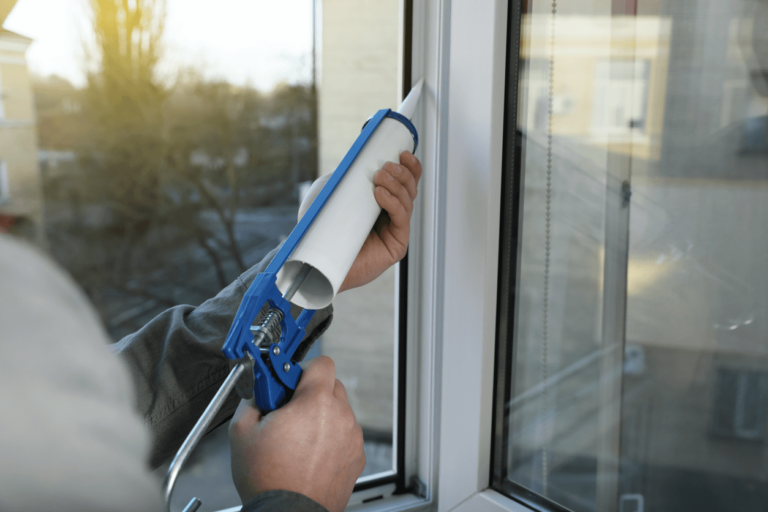
- Caulk gun: For applying new caulk.
- High-quality exterior caulk: Choose a caulk specifically designed for outdoor use and suitable for your window material (e.g., wood, vinyl, or metal).
- Utility knife or putty knife: For removing old caulk or sealant.
- Clean, dry cloth: To wipe down the area.
Removing Damaged Sealant
- Carefully remove the old, damaged caulk or sealant using a utility or putty knife.
- Ensure the area is clean and dry before proceeding.
- Apply new sealant.
- Load the caulk gun with the exterior caulk.
- Apply a continuous bead of caulk along the gap or seam between the window frame and the wall.
- To smooth and shape the caulk, use a caulk smoothing tool or your finger.
- Allow it to dry according to the manufacturer’s instructions.
Properly sealing your windows can prevent water leaks and enhance energy efficiency in your home.
Addressing Roof Leaks During Heavy Rain: Minimizing Water Damage
Dealing with a roof leak during heavy rain can be stressful, but knowing how to implement emergency fixes can help you minimize water damage. Whether it’s a temporary patch on the roof or addressing water leaks around windows, taking swift action is key.
Odyssey Home Remodeling is here to support you with all of your roofing needs. Our team will help you address immediate issues and evaluate your roof’s overall performance. If you are in Illinois, Wisconsin, or Indiana, we are just a phone call away. Let us help you protect your home!